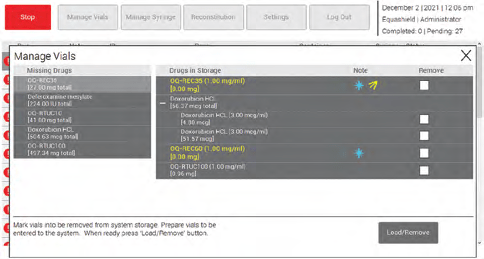
Manage Vials #
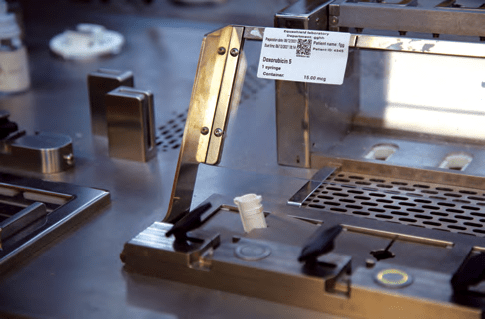
The drug vials need to be loaded into the system capped with an EQUASHIELD® vial adaptor (VA) – including VA- 20/2, VA-20C/2, VA-13/2, VA-13C/2, VA-17/2, and VA-28/2. Placing the vial adaptors on the vials should be done according to EQUASHIELD’s IFU. The VA must fit the vial properly. The vial label should be intact and clean of any marks. The VA must NOT cover the vial label.
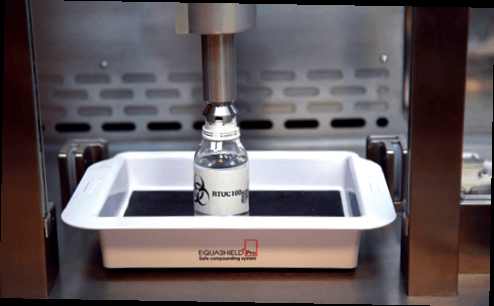
Drug identification is performed by matching the information in the system database with the computerized identification on the vial label. The Vial Robot takes the drug vial from a designated tray which is used to load the vials into the system. Then, the system camera scans the vial label to identify the drug vial.
The management of vials consists of:
- Preparing vials that need to be entered into the system.
- Marking vials that need to be removed from the system storage.
To manage the vials:
On the Main Menu screen, press the ‘Manage Vials’ button.
The Manage Vials window will open.
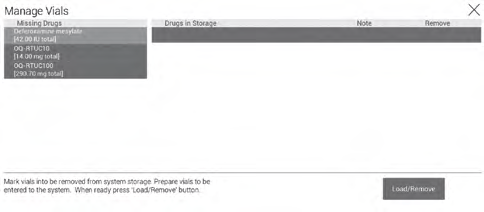
Press the ‘Load/Remove’ button to inform the system that you wish to load vials.
Wait until the system is ready before inserting your hands into the vial insertion area.
The following warning will appear:

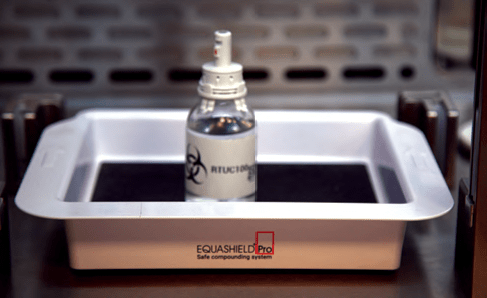
Once the notification ‘Please insert tray or vial (onto the tray in the vial loading area) and press Done’ appears, insert the tray containing the vial with the drug.
Ensure that the tray with vials is placed all the way in the proper position (until the edge). In addition, there will be a green light on the sensors indicating that it is safe to load the vial tray.
NOTICE – Do not put on the tray anything else other than a vial with a fixed VA.
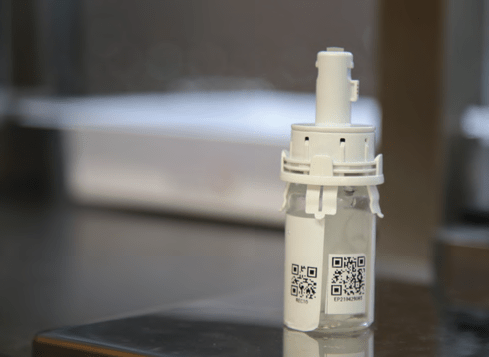
Vials with powder-form drugs that need reconstitution should have a second ‘reconstitution’ sticker provided by the system, as detailed in “Perform Reconstitution – Vial preparation.”
NOTICE – Do not load drugs into the EQUASHIELD®
Pro system that were reconstituted outside the system.
Press the Done button.
A notification ‘Load is being processed’ will appear on the Operator screen. The robot will grasp the vial, identify its label using image processing, and put it in the storage area.
In the event that the EQUASHIELD® Pro is unable to recognize the vial location on the tray, the screen will have an error message reading “Object not recognized”. It is recommended to reposition the vials on the tray, preferably not in the corners of the vial tray. After repositioning the vials, repeat the process to initiate vial recognition.
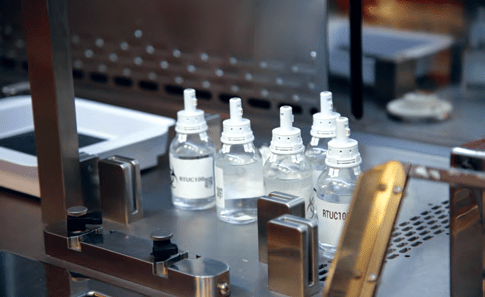
The drug will be loaded into the ‘ Drugs in Storage’ list.
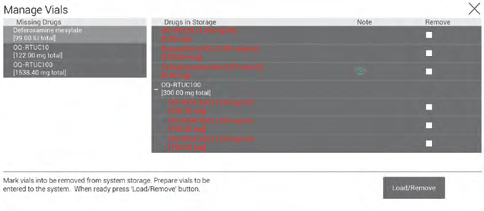
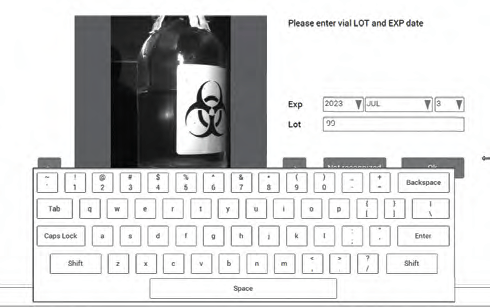
The frame of the ‘Manage Vials’ button will blink red, and the vial data will appear in red in the ‘Drugs in Storage’ list. Then, the user should press the line with the drug name in red. A new screen will pop up, and prompt the user to enter the drug’s expiry date and lot number. There may be an option to pick the expiry date or lot number from a drop-down box depending on the facility’s preference.
Once verified, the drug line will turn ‘white’ indicating it is ready for use. Until the data is entered, the drug data will appear red on the screen.
Manual vial recognition: If the system fails to identify the vial’s label, it will give you the option to identify the label manually. If required, the scanned images of the vial label will be sent to the supervisor’s workstation for recognition. The manual recognition must be done by the supervisor only, using a manual label recognition wizard. Drugs in powder form: If the drug needs to be reconstituted, the vial data will appear yellow on the screen until the reconstitution is completed.
Removal of vials from the system:
Press the checkbox next to the drug name in the ‘Drugs in Storage’ list, under the ‘Remove’ column.
Press the Load/Remove button. The drug will be removed from the storage list and the Vial Robot will move it from the storage area to the tray. Press the Load/Remove button again. The green light indicator will light up on the sensors, indicating to the user that it is safe to unload the vials from the tray. Once the vials are removed, press DONE.
Missing drug: Until all the required drugs are loaded, a red warning sign ! will appear in the preparation line, next to the requirement on the main screen.

A warning notification will appear if the operator tries to proceed before fulfilling the requirement.

Note that the operator cannot remove a vial from the missing drugs list or a prescription from the prescriptions list.
NOTICE!!! DO NOT REMOVE VIALS MANUALLY OR INSERT YOUR HANDS INTO THE VIAL STORAGE AREA.
If the system senses an interruption in the storage area, it will STOP IMMEDIATELY (the optic safety sensor detects a breach). The operator will then be required to empty the system and reload it. Prescriptions that are being compounded at that time will not pass validation, and all other processes will need to be restarted. When the vials loading procedure ends, the user must close the vial loading window by pushing the top-right corner cross (x).
Manage Syringe Units #
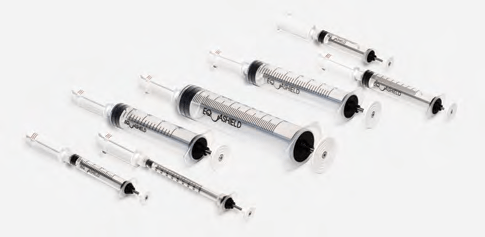
The system can only handle EQUASHIELD’s syringe units. The syringe units come in seven different sizes: 3, 5, 10, 20, 35, 60 ml. EQUASHIELD’s 1ml and EZ60 shall NOT be loaded into the system.
Syringe management consists of:
- Preparing syringe units that need to be loaded into the system.
- Selecting syringe units that need to be removed from the system.
Until all the required syringe units are loaded, a red warning sign ! will appear in the preparation line, next to the requirement on the main screen.

A warning notification will appear if the operator tries to proceed before fulfilling the requirement.

Loading Syringe Units into EQUASHIELD® Pro #
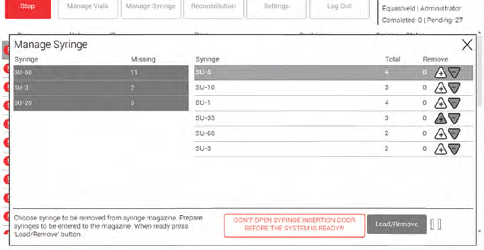
In the Main Menu screen, press the Manage Syringe button. The Manage Syringe window will open.
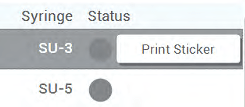
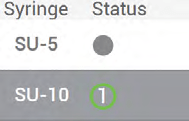
The required syringe units are itemized in the syringe list on the left-hand side of the screen, including type and quantity. The SU refers to syringe unit, and the number is the syringe size as detailed above. To insert a syringe into the system, press the ‘Load/Remove’ button.
The following warning will appear:

Wait for the notification that the system is ready before starting the syringe loading process. A countdown of 15 seconds will start – open the syringe door during the 15 second countdown. A green light indicator will light up on the sensors, indicating it is safe for the user to load the syringe units into the system.
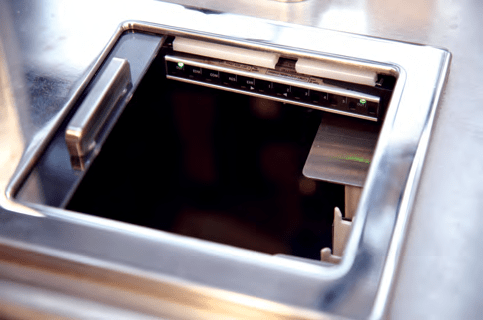
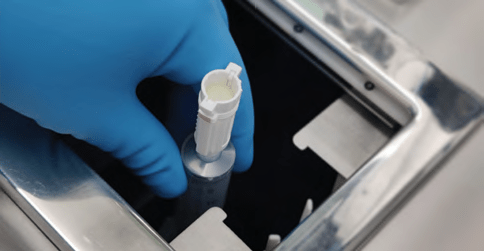
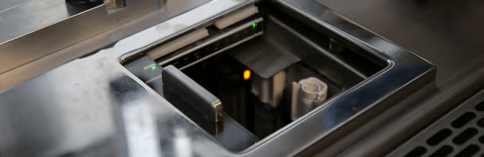
Insert an empty syringe into the syringe mount, with the CSTD device on top (white component), making sure that the red stripes are facing you and that the syringe unit is placed securely within the syringe mount.
Please ensure the following prior to loading the syringe unit:
- The syringe unit should be new
- The syringe unit plunger should be completely depressed (pushed all the way in)
- Do not manipulate the syringe unit prior to loading (i.e. push in/out the plunger)
- The ink on the syringe unit should be legible
- Do not touch the yellow membrane in the syringe unit
NOTICE!!! Make sure the red stripes are facing the operator.
NOTICE!!! After inserting the last Syringe Unit, wait for 3 seconds before closing the door. The lapsed time allows for the syringe unit to be photographed by the image processing cameras and identified. If the operator closes the door of the syringe loading unit before the syringe identification, the syringe unit may not be properly identified and the process of identification will have to be repeated.
Once the syringe unit is entered correctly, take your hands out (above the syringe door). When the optic safety sensor senses that all hands are out, a light will turn on and a picture of the syringe unit will be taken to identify the syringe size. Afterward, the conveyor will move until an empty mount appears. Insert another syringe unit or close the door. Ensure that all syringe units have been recognized by the EQUASHIELD® Pro before closing the door.
The loaded syringe units will be added to the Syringe units list on the right-hand side of the screen.
Note the table on the screen that indicates how many syringe units of each size is already loaded into the system. After the EQUASHIELD ® Pro identifies a new loaded syringe unit, the corresponding number of units will increase.

Removing Syringe Units from EQUASHIELD® Pro #
When the operator closes the door, the Manage Syringe window will automatically close on the user screen.
To remove a Syringe Unit from the conveyor:
Press + in the right-hand list, under the ‘Remove’ column (press again to remove additional Syringe Units). Press the Load/Remove button and open the Syringe Unit door according to the instructions above. The Syringe Unit will be placed on the accessible mount for removal, take it out and close the door. The Syringe Unit will be removed from the storage list on the user screen.
Ensure the removal of the syringe unit has been processed by the EQUASHIELD ® Pro by visualizing the decrease in quantity on the screen. After the removal of the syringe unit(s) is performed, the operator should close the syringe unit door. When the operator closes the door, the Manage Syringe window will automatically close on the user screen.
Prescription Compounding #
Syringe Unit as the Final Container #
The system can use a syringe unit as its delivery container to the patient.
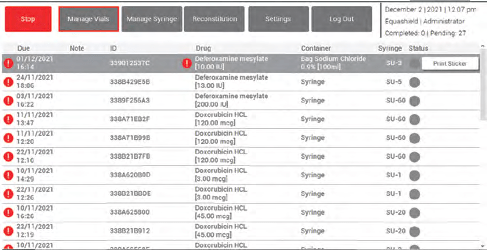
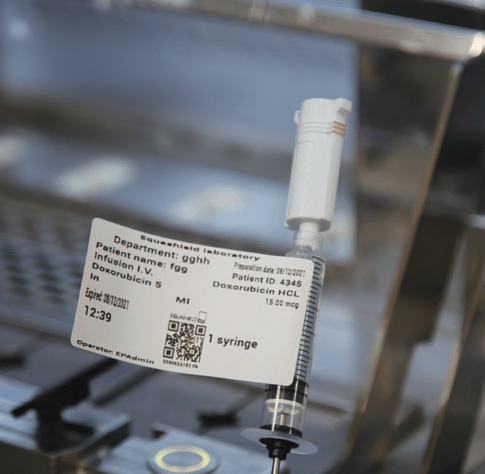
To start a prescription compounding for syringe units: Choose a prescription from the list on the operator’s main screen that has ‘Syringe’ under the container column. If there is more than one syringe unit in the preparation, the number of syringe units will appear before the word ‘Syringe’.
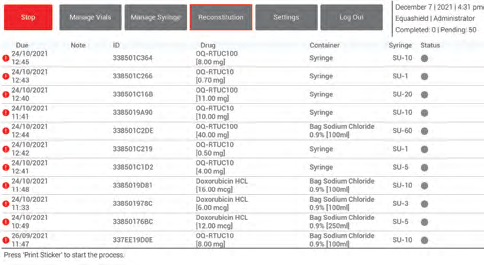
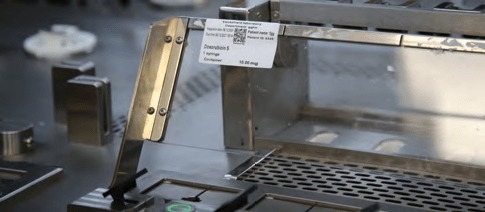
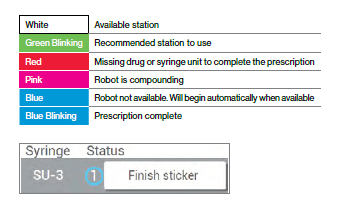
Press on the desired preparation, then press the Print Sticker button.

The printer will automatically print the sticker label at the printer station under the user screen.
In the event that the operator needs an additional sticker, the operator has the option to reprint the sticker by pressing the ‘Extra Sticker’ button on the bottom right-hand side of the screen.
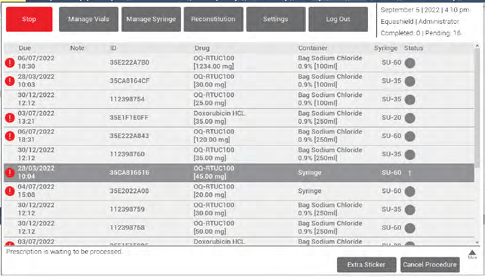
If the prescription is meant to be delivered in a syringe unit, a button on one of the IV Bag Bases will blink green. Place the sticker on the glass behind the blinking button. (Note that you can use any available preparation station. You do not need to use the station with the green blinking light. This is the robot’s suggestion for optimal automation.)
Press the corresponding button next to the station where the operator has placed the sticker.
If the compounding robot is available, the button will turn pink and a compounding process will begin. If the robot is not available, the button will turn blue, and the compounding will begin as soon as the robot is available.
In case a syringe unit or a drug is missing for the compounding of the prescription, the button will turn red and will start automatically as soon as the missing component is entered into the system. After the syringe unit is filled with the drug to the correct volume, it is pushed through a dedicated opening in front of where the sticker was placed. Wait for the light to blink blue!
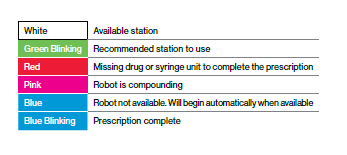
The operator will have to pull the syringe unit out and press the blinking blue button. The operator should take out the syringe unit delicately. Once the blue blinking button is pressed, a ‘Finish’ sticker
will be printed, and the operator will be requested to attach it to the syringe unit.
If the prescription includes more than 1 syringe unit, the button will turn pink again, and the next syringe will be filled. When all the required syringe units for the prescription are done, the prescription will disappear from the Operator screen, and the button will turn white again. The operator should remove the sticker from the Bag Rest (glass component) and dispose of it.
In case the process has failed, a ‘Fail’ sticker will be printed instead of the ‘Finish’ sticker. This sticker will indicate that the prescription is not for use. In case of a ‘Fail’ sticker, the process should be continued in the same manner, but the prescription is not qualified by the system and should not be delivered. The prescription will reappear on the Main Menu prescription list so that the operator can initiate the prescription compounding process at their convenience.
NOTICE!!! Only syringe units or IV bags with a ‘Finish’ sticker are qualified for use.
IV Bag as Final Container #
To start the prescription compounding of an IV bag: Choose a prescription from the list on the operator’s main screen, one that has ‘Bag’ under the container column.
When initiating an IV bag preparation, the operator needs to utilize the correct IV bag solution and volume to initiate the prescription.
The operator can identify the required IV bag by looking under the ‘Container’ column.
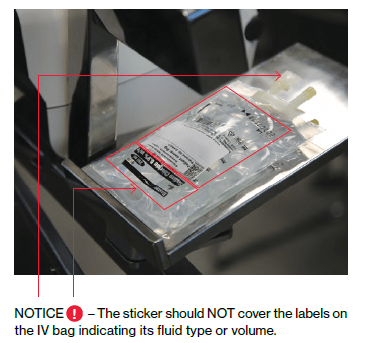
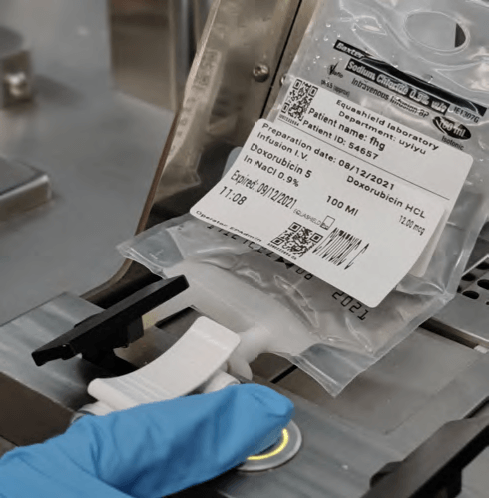
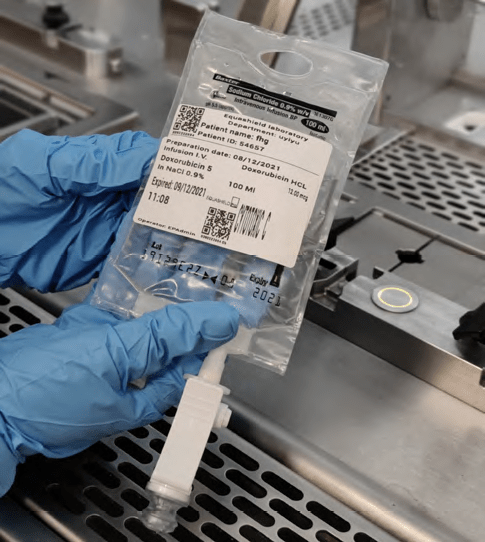
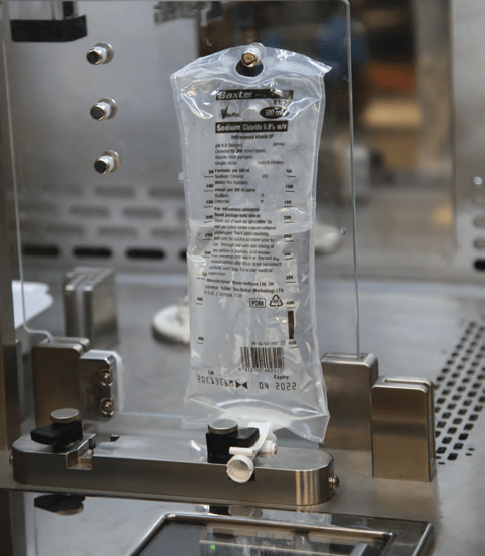
Place the printed sticker just below the label on the IV bag that indicates its fluid type and volume.
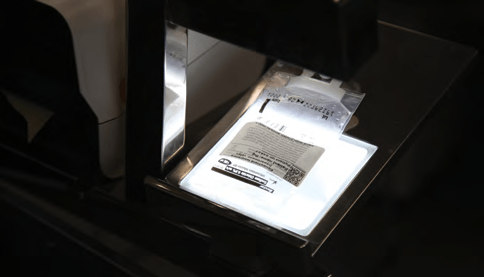
When placing the IV bag on the scanner, for label identification, ensure the following:
- The IV bag entry ports are towards the upper portion of the scanner (i.e. higher proximal to the label).
- The label is within the frame of the camera. as indicated by the image below.
Please refer to the picture below for visual reference.
The system will now direct the operator to place the bag with the sticker on the scanner, next to the printer. The scanner is only able to identify the IV bag based on what is written on the IV bag label. Therefore, it is the responsibility of the user to ensure that the IV bags that are loaded into the compounder reflect the label written on the bag and have not been manipulated prior (i.e. volume
added, volume withdrawn, medication added etc.).
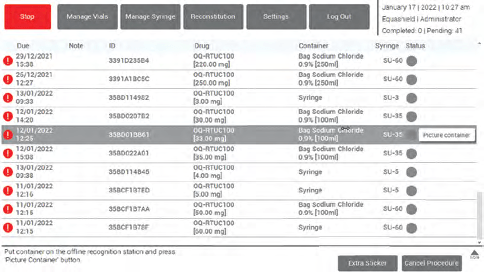
In the Status column of the relevant row on the main screen, press the Picture Container button.
After the button is pressed, the system will scan the bag label and the sticker, to verify their compatibility.

If the offline station doesn’t recognize the sticker or the IV bag, reposition the IV bag, and reattempt to take a picture with the ‘Picture Container’ button. If the IV bag is still not recognized, check that you are using the correct IV bag type and volume and that the label on the IV bag indicating type of fluid and volume is not covered. If needed, you can press the Extra Sticker button and place a new sticker on the IV bag The EQUASHIELD ® Pro will attempt to identify the IV bag type and content up to three times. If the EQUASHIELD ® Pro is unable to identify the IV bag type and content after three times, it will allow the user to enter the information regarding the IV bag manually. It is the responsibility of the operator to ensure that the information is entered manually is accurate.
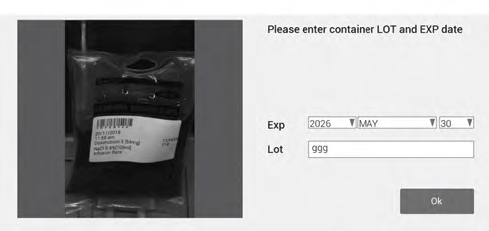
Once completed successfully, the operator will be requested to manually enter the batch number and the expiry date of the IV bag. There will also be an option to ‘Mark Vial as Full’.
When the recognition is complete, the relevant Status button will become green.
The recommended station button with the same number as the status (‘1’ in the example) will blink green. The IV bag should be placed under the laminar flow of the compounder and spiked with an EQUASHIELD® spike adaptor (SA) connector. Lock the spike adaptor with the
locking clip, then press the button at the corresponding station. For EQUASHIELD® Pro users utilizing luer lock customization instead of the spike adaptor variation, place the luer lock on the IV bag configuration under the laminar flow of the compounder. Note: The IV bag can be locked in the recommended station or any other free station. The process of locking the IV bag into the compounding station will depend on the type of EQUASHIELD (R) Pro used for compounding. To lock an IV bag with a spike adaptor, place the projecting portion of the spike adaptor through the hole. Then, press on the black flap at the station until it is in the proper position on the spike adaptor, holding it in place. To lock in a luer lock configuration, place the luer lock in
the correct orientation until secure. Then, press on the black flap at the station until it is in the proper position on the luer lock, holding it in place. Once the IV bag is secured in the base via a spike adaptor or luer lock, press the corresponding button of the station. After the button is pressed, the Bag Base camera will take an image capture to recognize the IV bag with the sticker.
If the compounding robot is available, the button will turn pink and a compounding process will begin. If the robot is not available, the button will turn blue, and the compounding will begin as soon as the robot is available. In case a syringe unit or a drug is missing for the compounding of the prescription, the button will turn red and blink, and will start automatically as soon as the missing component is entered into the system. After the IV bag is filled with the drug to the correct volume,
the button at the station will blink blue. The operator should choose the prescription on the main
screen and press the Finish Sticker butt on, to print the ‘Finish’ sticker.
Place the sticker on the bag, just below the first sticker, ensuring that the QR codes on both labels are not covered, and press the blue blinking button.
Following a correct recognition, the lock will open. The operator will take the bag out, and the button will turn white. The technician should visualize the IV bag and label, including checking for particles. Once the technician has reviewed the preparation, it is ready for use.
If the Equashield ® Pro fails to release the IV bag, please ensure the following:
- Check that the operator placed the correct validation Finish Sticker on the correct preparation.
- Ensure that the QR codes on the initial preparation sticker and Finish sticker are not accidentally covered and are legible.
- Reposition the IV Bag to assist the camera to capture the 2 QR codes.
- Press the corresponding button next to the station again.
In case the process has failed, a ‘Fail’ sticker will print instead of the ‘Finish’ sticker. This sticker will indicate that the prescription is not for use. In case of a ‘Fail’ sticker, the process should be continued in the same manner, but the prescription is not qualified for use by the system.
The prescription will reappear on the Main Menu prescription list so that the operator can initiate the
prescription compounding process at their convenience.
Perform Reconstitution #
The system can reconstitute drugs in vials.
Vial Preparation #
Before inserting a vial that needs to be reconstituted into the system, the operator is required to perform one of these options:
EQUASHIELD® can provide a roll of QR code stickers to the facility. Take one sticker, and apply
it to the vial in an area that does not cover up the label. take one sticker, and attach it to the vial.
Alternatively, the user can print QR stickers directly from the EQUASHIELD Pro.
After you have placed the QR code sticker on the vial, the vial can be loaded into the Pro using the Manage Vials procedure.
How to Print QR Code Stickers for Reconstitution #
On the main screen, press the Settings button, then Options.
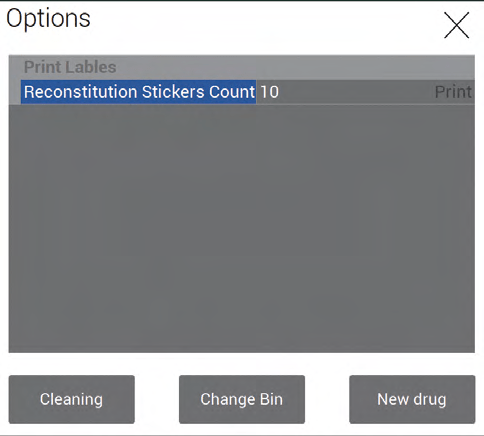
The number represents the number of stickers that will be printed.
Every sticker contains 10 barcodes. Press Print to print the sticker with the barcodes.
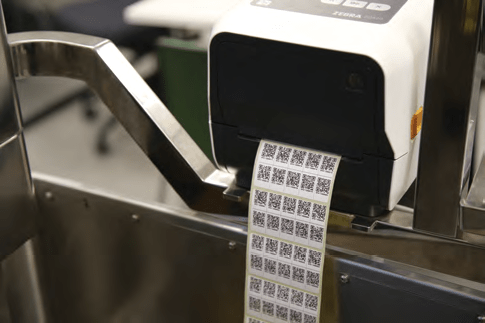
Place only one QR code on the vial. The rest of the QR code stickers can be saved for other vials
that need reconstitution.
Diluent Solution for Reconstitution #
Determine the diluent solutions (up to 2) that will be used for reconstituting your prescriptions. (E.g.: Normal Saline, Dextrose, etc.) The diluent bags will be re-used for multiple prescription preparations.
Enter the information of the diluent bag(s) under the “Reconstitution’ tab. Ensure you have entered the correct information for the Left and Right stations. To lock the spike adaptor SA-W in the base, screw the adjustable twist cap until the spike adaptor SA-W is secure in the base.
Enter the diluent data to the system by completing the following steps:
Press the ‘Reconstitution’ button on the main screen.
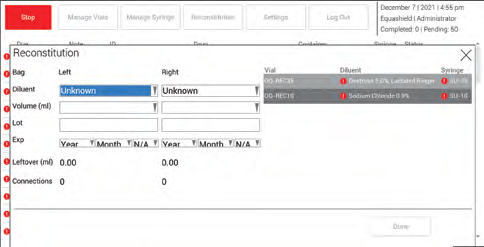
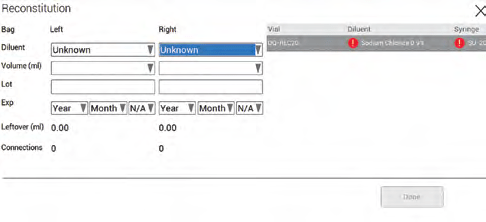
There are dedicated combo boxes (left and right – see image) for two diluent bags.
Use the dropdown list in the Diluent field to input the correct diluent type for the drug.
Input the following details:
Volume in ml (dropdown list – options are 0ml, 250ml, 500ml, 1000ml). No partially used IV bags should be loaded into the reconstitution station. Lot number (use the onscreen keyboard)
The expiry date of the drug (use the onscreen keyboard), ‘year’ and ‘month’ are required, ‘day’ is optional. *Note that this is a manual input, so double-check that the IV bag information is accurately entered into the system.
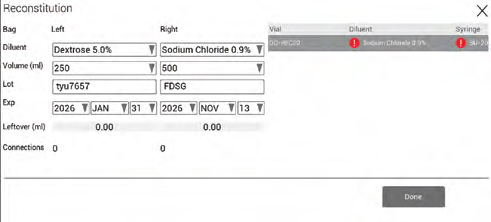
Press the Done button.
The leftover capacity will be calculated automatically. The number of times the Spike Adaptor SA-W was utilized will be counted automatically. After 10 connections, a message will appear and the operator will be requested to change the diluent bag. NOTICE!!! Only load new IV bags into the system. Partially used IV bags cannot be used. Otherwise, the system will miscalculate the volume remaining in the IV bag.
Reconstitution #
If the diluent is missing for the reconstitution of a drug that was fed to the system, the frame of the Reconstitution button will blink in red. Feed the system with the required diluent and press the button to enter the diluent data to the system.

After the diluent is injected, the reconstituted drug is moved to the Shaker to be shaken in order to allow the powder to be dissolved properly. A shaking method should be programed in the database for every drug which requires reconstitution. After the shaking is completed, the vial needs to be
inspected by the operator to verify that it was shaken well. Only when fed to the system for the second time, the vial is qualified to be used for compounding. The process is as follows: After the shaking program is done, the vial will be returned to the storage, but it will now be marked by the system to be taken out. To take it out, the operator should press the Manage Vials button. See
more details in the Manage the Vials section.
Waste Bin Replacement #
On the main menu, press Options -> Change Bin. The door on the right-hand side will open and the light will turn on. Put the covers on the bins, take them out of the system carefully, and close the door. Dispose of the waste according to the facility’s policy.
NOTE!!! PLEASE CLOSE THE DOORS AS SOON AS POSSIBLE
Now, the following message will appear:
- Robots will start moving now. Do you want to continue? Press OK.
- Please wait while recovering! Now the Syringe Magazine will be scanned. Once recovery is complete, the main screen will reappear and all prescriptions will be ready again for preparation
Stopping the System from the Operator Screen #
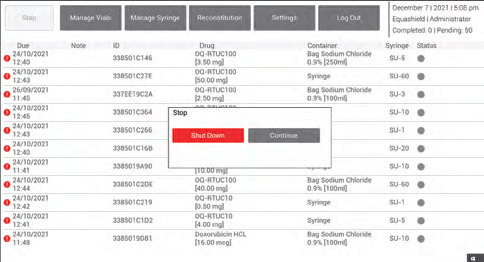
The system can also be stopped directly from the Operator screen. This will be an organized and planned stop. When the red STOP button is pressed on the Operator screen, a notification will appear on the main screen as follows:
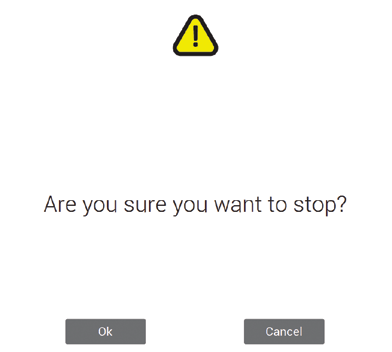
- To continue with the preparations, press Cancel, to shut down the system press OK.
A second warning notification will appear: - To continue with the preparations, press Continue, to shut down the system press the red Shut Down button.
The following actions will take place:
Once all preparations in process are done, all the vials will be placed onto the vial tray, and the operator will be notified when to extract the drug vials. This process will automatically be repeated by the robot until all vials are emptied from the storage area.
The extraction of the syringe units from the Syringe Insertion Door is done on a one-by-one basis from the mount, followed by image processing scans made by the camera. The operator will be notified when to open the Syringe Insertion Door. Once the door is open, the operator will manually extract the syringe units from the mounts one by one. When all syringe units are out, the operator will be required to close the Syringe Insertion Door. The infusion Bag Bases’ magnetic interlocks open up automatically, and the operator will be required to extract the IV bags.